- Java Programming Basics
- Java Tutorial
- Java Overview
- Java Environment Setup
- Java Program Structure
- Java Basic Syntax
- Java First Program
- Java Constants
- Java Separators
- Java Keywords
- Java Data Types
- Java Data Types
- Java Integers
- Java Floating Point
- Java Characters
- Java Booleans
- Java Numbers
- Java Programming Variables
- Java Variables
- Java Variable Types
- Java Variable Scope
- Java Type Conversion
- Java Type Casting
- Java Auto Type Promotion
- Java Type Promotion Rules
- Java Programming Arrays
- Java Arrays
- Java One Dimensional Array
- Java Multidimensional Array
- Java Programming Operators
- Java Operators
- Java Arithmetic Operators
- Java Increment Decrement
- Java Bitwise Operators
- Java Left Shift
- Java Right Shift
- Java Relational Operators
- Java Boolean Logical Operators
- Java Ternary(?) Operator
- Java Operator Precedence
- Java Control Statements
- Java Decision Making
- Java if if-else if-else-if
- Java switch Statement
- Java Loops
- Java while Loop
- Java do-while Loop
- Java for Loop
- Java for-each Loop
- Java Nested Loops
- Java break Statement
- Java continue Statement
- Java Class Object Method
- Java Classes and Objects
- Java Class
- Java Object
- Java new Operator
- Java Methods
- Java Constructors
- Java this Keyword
- Java Stack
- Java Overloading Recursion
- Java Method Overloading
- Java Constructor Overloading
- Java Object as Parameter
- Java Call by Value Reference
- Java Returning Objects
- Java Recursion
- Java Modifier Types
- Java Encapsulate Poly String
- Java Encapsulation
- Java Polymorphism
- Java Nested Inner Class
- Java Strings
- Java Command Line Arguments
- Java Variable Length Arguments
- Java Inheritance Abstraction
- Java Inheritance
- Java super Superclass
- Java Multilevel Hierarchy
- Java Method Overriding
- Java Abstraction
- Java Packages Interfaces
- Java Packages
- Java Access Protection
- Java Import Statement
- Java Interfaces
- Java Programming Exceptions
- Java Exception Handling
- Java try catch
- Java throw throws
- Java finally Block
- Java Built In Exceptions
- Java Exception Subclasses
- Java Chained Exceptions
- Java Multithreading
- Java Multithreading
- Java Thread Model
- Java Main Thread
- Java Create Thread
- Java Thread Priorities
- Java Synchronization
- Java Inter Thread Communication
- Java Suspend Resume Stop Thread
- Java Get Thread State
- Java Enum Autobox Annotation
- Java Enumerations
- Java Type Wrappers
- Java Autoboxing
- Java Annotation
- Java Marker Annotations
- Java Single Member Annotation
- Java Built In Annotations
- Java Type Annotations
- Java Repeating Annotations
- Java Data File Handling
- Java Files I/O
- Java Streams
- Java Read Console Input
- Java Write Console Output
- Java PrintWriter Class
- Java Read Write Files
- Java Automatically Close File
- Java Programming Advance
- Java Date and Time
- Java Regular Expressions
- Java Collections Framework
- Java Generics
- Java Data Structures
- Java Network Programming
- Java Serialization
- Java Send Email
- Java Applet Basics
- Java Documentation
- Java Programming Examples
- Java Programming Examples
Java try catch
Although the default exception handler provided by the Java run-time system is useful for debugging, you will usually want to handle an exception yourself. Doing so provides the following two benefits:
- It allows you to fix the error.
- It prevents the program from automatically terminating.
Most users would be confused if your program stopped running and printed a stack trace whenever an error occurred. Fortunately, it is quite easy to prevent this.
To guard against and handle a run-time error, simply enclose the code that you want to monitor inside a try block. Immediately following the try block, include a catch clause that specifies the exception type that you wish to catch.
Java try catch Example
To illustrate how easily this can be done, the following program includes a try block and a catch clause that processes the ArithmeticException generated by the division-by-zero error :
/* Java Program Example - Java try and catch
 * This program illustrates the uses of try
 * and catch in Java */

 class JavaProgram
 {
     public static void main(String args[])
     {
         int denom = 0, num = 52, res;

         try {      // monitor a block of code

             res = num / denom;
             System.out.println("This will not be printed");

         } catch(ArithmeticException e) {       // catch divide-by-zero error

             System.out.println("Division by zero Error..!!");
         }

         System.out.println("After catch statement");
     }
 }
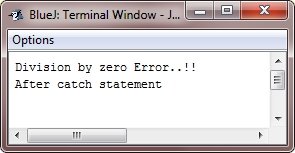
When the above Java program is compile and executed, it will produce the following output:

Notice that the call to println() inside the try block is never executed. Once an exception is thrown, program control transfers out of try block into catch block. Put differently, the catch is not "called", so execution never "returns" to the try block from a catch. Thus, the line "This will not be printed" is not displayed. Once the catch statement is executed, program control continues with the next line in the program following the entire try / catch mechanism.
A try and its catch statement form a unit. The scope of the catch clause is restricted to those statements specified by the immediately preceding the try statement. A catch statement cannot catch an exception thrown by another try statement (except in the case of nested try statements). The statements that are protected by the try must be surrounded by curly braces i.e., they must be within a block. You cannot use try on a single statement.
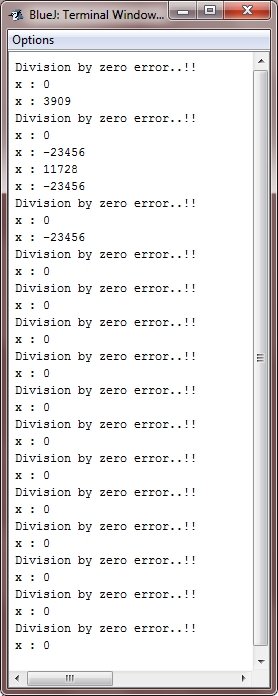
The goal of most well-constructed catch clause should be to resolve the exceptional condition and then continue on as if the error had never happened. For example, in the upcoming example program each iteration of the for loop obtains the two random integers. Those two integers are divided by each other, and the result is used to divide the value 23456. The final result is put into variable x. If either division operation causes a divide-by-zero error, it is caught, the value of x is set to zero, and the program continues.
/* Java Program Example - Java try and catch
 * This program handle an exception and
 * move on */

 import java.util.Random;

 class JavaProgram
 {
     public static void main(String args[])
     {

         int x = 0, y = 0, z = 0;

         Random ran = new Random();

         for(int i=0; i<20; i++)
         {
             try {

                 y = ran.nextInt();
                 z = ran.nextInt();
                 x = 23456 / (y/z);

             } catch (ArithmeticException e) {

                 System.out.println("Division by zero error..!!");
                 x = 0;      // set x to zero and continue

             }

             System.out.println("x : " + x);

         }

     }
 }
When the above Java program is compile and executed, it will produce the following output:

« Previous Tutorial Next Tutorial »